配置环境
下载源码 http://download.qt.io/archive/qt/5.15/5.15.0/single/
下载 zip 包(下载过 tar.xz 包,在 Windows 上用 7zip 解压后竟然缺少文件,而且还没有错误提示)
编译前需要安装:Perl、Python、Ruby 并确保他们的可执行路径在 Path 变量中。
Python 要安装 2.7.5 及以后的 2.7 版本,python3 是不行的。用于编译 QtWebEngine
Python2.7.x 装好后把路径 C:\Python27 添加到 path,把可执行程序 python.exe 重命名为 python2.exe
安装 clang,生成 Qt 文档要用。
下载 jom https://wiki.qt.io/Jom 替代 nmake,可支持多核编译,加快编译速度。
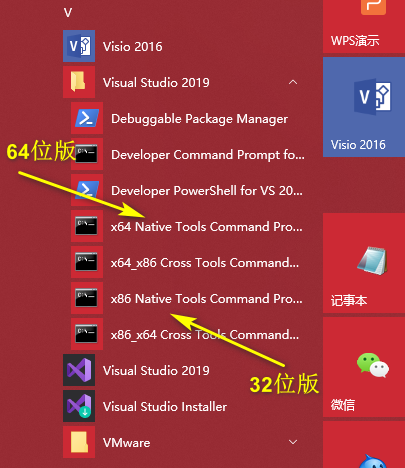
msvc2019 版
打开 VS 自带的命令提示窗口
编译 openssl
Windows 上编译需要使用 Perl
安装 perl
ActivePerl (5.26、5.28)装上后配置 openssl 时用提示缺少 Win32::Console 模组,用于安装模组的 cpan 命令又需要这个模组,这也太矛盾了吧!网上也有不少人遇到这个问题,难道发布时就不测测?好奇怪呀。所以最后安装了 StrawberryPerl 5.28.2.1,一切正常。
下载 openssl 源码:https://github.com/openssl/openssl
下载 NASM 汇编编译器:https://www.nasm.us/
set path=C:\Users\Matt\AppData\Local\bin\NASM;%path%
编译静态链接库版本:
perl Configure VC-WIN64A --prefix=D:\Qt\openssl-OpenSSL_1_1_1-stable\release\vc_x64_static --openssldir=D:\Qt\openssl-OpenSSL_1_1_1-stable\release\vc_x64_static no-asm no-shared
# no-shared 编译成静态库

nmake
nmake test  测试编译结果 Result: PASS
nmake install
编译 Qt
set LLVM_INSTALL_DIR=C:\Program Files\LLVM
set path=D:\Qt\jom_1_1_3;%path%

configure -opensource -confirm-license -static -debug-and-release -prefix "D:\Qt\kits\Qt5.15.0_MSVC2019_x64_static" -qt-zlib -qt-pcre -qt-libpng -qt-libjpeg -qt-freetype -opengl desktop -qt-sqlite -openssl-linked OPENSSL_PREFIX=“D:\Qt\openssl-OpenSSL_1_1_1-stable\release\vc_x64_static" -skip qtwebengine  -nomake examples -nomake tests
如果想重新配置,手动删除源码根目录的 config.cache。
配置完后提示:
Qt is now configured for building. Just run 'nmake'.
Once everything is built, you must run 'nmake install'.
Qt will be installed into 'D:\Qt\kits\Qt5.15.0_MSVC2019_x64_static'.
Prior to reconfiguration, make sure you remove any leftovers from
the previous build.
编译:
nmake
nmake install
Qt is now configured for building. Just run 'jom'.
Once everything is built, you must run 'jom install'.
Qt will be installed into 'D:\Qt\kits\Qt5.15.0_MSVC2019_x64_static'.
Prior to reconfiguration, make sure you remove any leftovers from
the previous build.
编译:
jom -j 12
jom install
MinGW 版
打开 mingw32 版 Qt 附带的命令行工具:

configure -opensource -confirm-license -static -release -platform win32-g++ -prefix "D:\Qt\build\Qt5.15.0_MinGW_x86" -qt-zlib -qt-pcre -qt-libpng -qt-libjpeg -qt-freetype -opengl desktop -qt-sqlite -nomake examples -nomake tests
配置完后提示:
Qt is now configured for building. Just run 'mingw32-make'.
Once everything is built, you must run 'mingw32-make install'.
Qt will be installed into 'D:\Qt\build\Qt5.15.0_MinGW_x86'.
Prior to reconfiguration, make sure you remove any leftovers from
the previous build.
编译:
mingw32-make -j8
mingw32-make install


 发表于 2024-1-23 12:39:48